
In tournaments, players are ranked by their win-loss record. If multiple players have an equal win-loss record (a common occurrence), ties are broken by one’s spread. Spread is the number of points scored minus the number of points allowed over the course of the entire tournament. Since there are usually less than 30 games in a tournament, spread often has a significant role in determining the winner.
Because spread plays can play a pivotal role in determining the winner of the tournament, players must adapt their strategy to accrue enough spread to win the tournament. Players will continue playing even after the outcome has been decided, trying to accrue more spread.
Many tournament players only consider spread in the final round(s). However, spread is important enough that you should think about it much earlier. If you have a low spread, you must win an additional game if you want to win the tournament.
The importance of spread depends on your position in spread relative to the other field. For simplicity, we will call situations where spread is irrelevant spread neutral, while situations where spread is extremely important are spread dependent.
| Spread: (28 game tournament) | Spread: (28 game tournament) | |
| 18-6 +1100 | 15-4 +1000 | |
| 18-6 +490: | 14-5 +860: | |
| 17-7 +550 | 13-6 +800 | |
| 16-8 +750 | 13-6 +700 | |
| 16-8 +550 | 12-7 +750 | |
| 16-8 +250 | 12-7 +550 |
On the left side, spread is a non-factor. Under this scenario, you should almost never sacrifice winning chances for spread. Since you have such a small chance of winning the tournament based on spread, you should basically ignore spread altogether.
On the right side, spread is immensely important. Winning a game by 200 points increases your chances of winning the tournament significantly more than winning by 20 points. Spread is likely to have an important role on who wins the tournament, and since you can win based on spread, you should do your best to maximize that spread.
While you should maximize your spread early in the tournament, you should not jeopardize your winning chances unless you can substantially increase your spread. A good ratio to use is that for every 1% of winning chances you sacrifice, you should gain approximately 12 spread points early in the tournament. The importance of spread also depends on how many games are remaining. As your tournament position becomes more spread dependent or spread neutral, you can adjust this ratio accordingly.
Spread dependency also depends on tournament position.
Players who have a poor win-loss record need spread more than players doing well early in a tournament. They need many things to go right for them, and thus need risks to improve their position.
| Diagram 1 | Diagram 2 | |
 |
 |
|
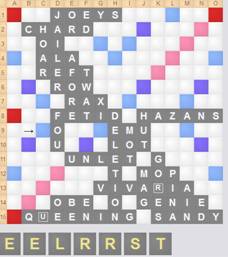
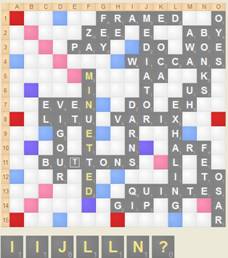
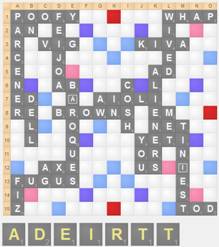
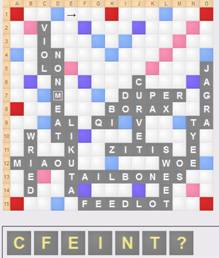
| Score: 371-343 | Score: 422- [343/415] | |
| Choices: RES o6 (3), FOUR d8 (13) | Choices: Challenge, accept and play JInNI (42) | |
| Pool: BCDIIIKUPW | Last play: MINUETTED* f5 (72) | |
| Stage: Early in tournament | Stage: Early in tournament |
In Diagram 1, while you could lose by playing FOUR and letting your opponent play WICKIUPS o1 for 122, you should take your chances and play FOUR anyway. The spread that you will gain from the 10 points and additional bingo chances are worth taking the minimal risk of your opponent drawing and playing the miracle bingo.
In Diagram 2, you could accept MINUETTED* and take a guaranteed win, or challenge MINUETTED* and risk losing the game. By accepting the phoney, you will win the game by 36, but if you challenge MINUETTED* you will win the game by 144. In this case, you will gain 108 spread points by challenging off the phoney. Using our ratio, you need to be 91% sure that MINUETTED* is phoney if you are going to challenge.
Because of this, you should not challenge very often. Most players are overconfident when they assess the validity of words, and you aren’t getting very good odds to challenge. However, if you are in a spread dependent position, then you should be more likely to challenge. However, if you are pretty sure, then a challenge is mandatory.
| Diagram 3 | Diagram 4 | |
 |
 |
|
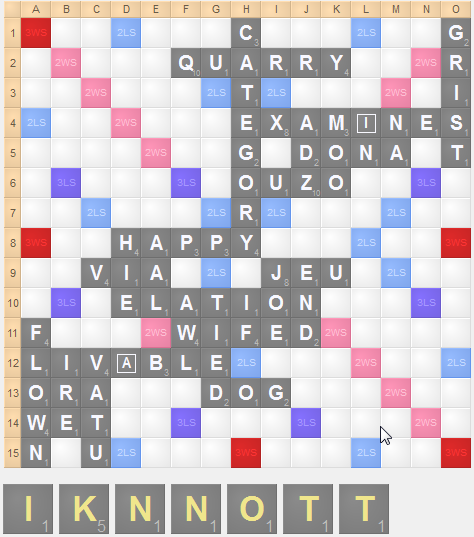
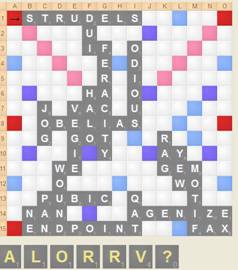
| Score: 375-304 | Score: 405-346 | |
| Choices: KNOTTING 5a (76) | Choices: LAV b8 (27), VOWER 11b (11) | |
| UNKNOT 15c (33) | VORtEX o10 (16), REX o13 (10) | |
| Pool: AABCDEEEEEHIIILMORSSS | Pool: ADEEEEHIIKLMNRSTT? | |
| Spread neutral | Spread neutral |
In spread neutral positions, you are often forced to give up huge amounts of equity to preserve games that you would never consider otherwise. In Diagram 1, you will rarely lose after bingoing with KNOTTING, but you will lose often enough that it is worth playing UNKNOT to be safe. Even though a bingo starting at a1 will only happen about 1 out of 150 times, this is more likely than losing the game after playing UNKNOT.
In Diagram 2, you are unlikely to lose even if your opponent bingos, but you have no good way of blocking the last bingo line. However, you should still block the last line by playing VORtEX for 16 points. Since spread has no relevance whatsoever, wasting your blank is okay since your opponent has no way to win the game. Any bingo that they could get down will require a setup or a miraculous 9 or 10 letter word, and even those won’t win the game. Although a win will be difficult for your opponent no matter what you play, VORtEX minimizes this possibility more than any other play, even though it eliminates the possibility of you increasing your spread.
In both of these situations, you would not want to go to these extremes to ignore spread at the beginning of the tournament, since the benefits to both UNKNOT and VORtEX are so minor. However, when spread no longer matters, it can change the way that you play drastically.
It is worth noting that I’m not saying “Always close the board when you’re ahead.” There is a difference between lead preservation and paranoia. As I said in the book, the best way to preserve a lead is usually to outscore your opponent, not to stop them from scoring. In these two positions, that happens not to be the case.
| Diagram 5 | Diagram 6 | |
 |
 |
|
| Score: 319-396 | Score: 274-261 | |
| Choices: AXED 12c (12), TARDIEST 14g (80) | Choices: CONFIdENT 4b (64), DECAF 14b (36) | |
| Pool: AEGIMNRT | Pool: AADEGGHHIMNNOPRRSSUUY | |
| Opponent’s last play: FIZ a13 (45) | Opponent’s last play: Exch. 7 | |
| Spread Dependent | Spread Dependent |
In Diagram 5, you can play TARDIEST and certainly lose, or fish off the D and hope that you draw the A to win the game by playing play either ZARATITE 15a (104) or PATRIATE o1 (83) next turn.
If you play AXED and do not draw the A, you will lose a lot of spread. Every other draw loses by around 170 points, while the A draw gives you a 2 point win. Thus, we expect to lose by 140 points. Meanwhile, if we play the bingo, we will lose by about 45 points, since our opponent will bingo some of the time and outscore us the rest of the time.
By using our earlier ratio, we are still better off taking our chances at the end of the game, but if we are in a more spread neutral position, we should concede by playing the bingo. Also, if we can imply (even weakly) that our opponent has the A, then we should be more likely to take the bingo and lose.
In Diagram 6, DECAF scores 28 points less, but has a good INT? leave. Normally this would make DECAF a better play, but this board is not very bingo friendly.
While you are slightly more likely to win by playing CONFIdENT, you should still play DECAF since it will increase your spread. To understand why, you should look at this game from your opponent’s viewpoint. Your opponent will feel that they need to draw the blank, since it is difficult to score on this board and they are behind. They will open the board in hopes of winning the game by drawing the blank and playing a bingo. Although the board is closed for now, you will still probably get to play a bingo and increase your spread. By withholding the blank, you are giving them false hope. They will sacrificing equity, trade tiles, and make openings, trying to draw the blank and win.